AION 2: SPIRITMASTER (정령성)
Master PvE, Input Macros & Familiar Progression Guide
Updated with KR End-Game MetaPart 1: Master PvE Setting & Class Guide
1. Class Overview & Traits
- Meta Position: Spiritmaster (정령성) has moved from a low-tier pick into a premier sustained DPS and party utility class in higher-tier dungeons following recent balance updates.
- Ease of Use: Simple skill mechanics with a low entry barrier, paired with a high ceiling via rhythm canceling and attack-weaving.
- Key Stats: Spiritmasters equip Orbs (보주), which possess the highest base Max Attack Power of all weapons. Priority stats: Max Attack Power (최대 공격력), Perfection (완벽), and Critical Strike (강타).
- Pet Stat Snapshotting: Pets scale off your character's stats at the exact moment they are summoned. Always cast self-buffs (Blessing of Flame (불길의 축복), Enhance: Spirit's Blessing (정령의 가호)) BEFORE summoning pets.
- Defensive Weakness: Lowest base HP in the game—proper positioning and dodging boss mechanics are mandatory.
2. Active Skills & Specialization Levels
- Frost Shock (냉기 충격 - Left Click) — Target Lv: 20 (Mandatory) | Spec: 2, 3, 4
Primary auto/filler skill. - Combustion (화염 전소) — Target Lv: 20+ (Mandatory) | Spec: 3, 4, 5
Core DPS skill. Unlocks Ash (재름) at Lv 20 (highest single-hit burst damage). - Spirits (소환: 정령) — Target Lv: 20 (Mandatory) | Spec: 1, 2, 3 or 2, 3, 4
- Fire Spirit (불의 정령): #1 choice for raw single-target DPS and boss phases.
- Wind Spirit (바람의 정령): [KR Meta Note] DO NOT IGNORE. Essential for high-mobility boss fights, attack-speed threshold mechanics, and rapid burst phases.
- Water Spirit (물의 정령) & Earth Spirit (땅의 정령): Situational utility, mana sustain, and tanking/grinding.
- Jointstrike: Curse (협공: 저주) — Target Lv: 20 (Mandatory) | Spec: 2, 3, 4
Forces pets into co-op attack chains. - Rapid Scattershot (연속 난사) — Target Lv: 16 (Standard) | Spec: 1, 5 or 4, 5
[KR Meta Note] Standard in high-tier dungeon rotations; used during boss stagger/groggy windows to accelerate cooldown resets. - Elemental Fusion (원소 융합) — Target Lv: 20 (Mandatory) | Spec: 2, 3, 5
Crucial setup skill at 4 Elemental Stacks (4원소). - Dimensional Control (공간 지배) — Target Lv: 16 | Spec: 2, 3
- Soul's Cry (영혼의 절규) — Skip in PvE (PvP crowd control skill).
3. Passive Skills Priority
- Spirit Strike (정령 타격): T1 Priority. Boosts PvE/PvP damage amp and Perfection.
- Mental Focus (정신 집중): T1 Priority. Increases Critical Strike.
- Element Unification (원소 결집): Stacks up to 5 times for bonus Crit Damage Amplification.
- Spirit Revitalization (정령 회생): Reduces pet summon cooldowns.
4. Stigma Loadout & Lv 25 Priority
Recommended PvE Stigmas
- Blessing of Flame (불길의 축복) — Lv 25
- Enhance: Spirit's Blessing (정령의 가호) — Lv 25
- Summon: Ancient Spirit (소환: 고대의 정령) — Lv 25
- Jointstrike: Corrode (부식) — Lv 25
- Jointstrike: Destructive Attack (협공: 파괴 공격) OR Assault Terror (강습 공포) — Lv 20
- Siphon (흡인) — Lv 20
Stigma Choice & Rotation
Beginner Option: Destructive Attack safely resets Curse and Corrode cooldowns.
Advanced KR Meta: Assault Terror grants +20% attack buff during burst phases (cancel forced dash with directional inputs).
Loop: Buff → Summon Ancient Spirit → Apply Corrode + Curse → Destructive Attack (reset) OR Assault Terror (buff).
5. Pre-Combat Buff Flowchart & Party Utility Role
Pre-Combat Pet Snapshot Sequence
Pets lock in your character's stats at the exact millisecond they appear. Missing a buff before summoning results in a permanent 15–20% pet DPS loss for that entire fight.
- Pop long-duration Consumables & Food.
- Cast
Blessing of Flame(불길의 축복). - Cast
Enhance: Spirit's Blessing(정령의 가호). - Summon Pet: Fire Spirit (불의 정령) for single-target bossing OR Wind Spirit (바람의 정령) for rapid/burst phases.
In high-tier end-game dungeons, boss DPS phases and shield mechanics rely heavily on timing stagger windows. Spiritmasters are expected to maintain defense-shred debuffs and align high-stagger skills with boss mechanic phases. Never waste high-stagger skills on standard DPS filler routines if a boss stagger phase is imminent.
Primary Utility & Debuffing Skills:
- Jointstrike: Corrode (협공: 부식): Essential Stigma skill that layers defense reduction onto the target to maximize party burst damage.
- Combustion (화염 전소): Key skill providing 3 Stagger Gauge Damage to rapidly break boss stagger bars during mechanical phases.
6. Arcana & Familiars
- Arcana (아르카나) Set: 4 Arcana of Punishment (징벌의 아르카나) + 4 Arcana of Protection (수호의 아르카나) for the +5% Weapon Damage Amplification 4-piece set bonus.
End-Game Flex: Players capping Hit/Crit via Familiars swap 2 Protection slots for offensive pieces like Mirror of Magic (마력의 거울). - Familiar (파밀리어) Stats: Slots 3 & 9 = Critical Strike (강타) | Slots 2 & 5 = Max Attack Power (최대 공격력) | Other Slots = Accuracy, Crit, & Attack Power.
Part 1.5: Launch Era Gear Progression & Acquisition (Pre-Etnen / Pre-Lv 50)
Before higher-tier level caps and late-game raid expansions, early KR/TW launch gearing for Spiritmaster (정령성) revolved around three core pillars: Player Crafting, Entry Dungeons, and Abyss AP Progression. Here is where to target early gear and how to build your foundation:
1. Primary Weapon: Orb (구슬)
Target: Heroic Crafted Orb OR Dungeon Drop Orb
- Player Crafting (제작) [Primary Route]: Crafted Orbs were heavily favored early on because they provided guaranteed Magic Accuracy (마법 명중) and Skill Speed (기술 속도) rolls without relying on random dungeon drop substats. Buy off the Auction House (거래소) or craft your own.
- Party Dungeons: Target boss drops in Fire Temple (불꽃의 신전) and Crow Cave (크로우 동굴) for early Heroic-tier weapons.
2. Armor Sets: Cloth (로브)
A. Entry Stage (Fresh Max Level)
Goal: Push initial Gear Score thresholds.
- Blue/Heroic Dungeon Cloth Set: Farm 3-Star Party Dungeons like Draupnir (드라우프니르), Urugugu (우루구구), and Vasharti (바샤르티).
B. Pre-Expansion Launch BiS
Goal: Clean offensive substats + Survivability.
- Crafted Heroic Cloth Set (영웅 제작 로브): Tradeable armor with reliable offensive stats (Skill Speed & Magic Accuracy).
- Abyss / AP PvP Cloth Set: Purchased via Abyss Point (AP) Merchants through Rifting, Open-World PvP, and Abyss Dailies. Crucial for surviving Assassin dives while stacking baseline Magic Accuracy.
3. Accessories, Arcana & Mana Stones
- Transcendence Arcana Cards: Clear Daevas and Arcanis Transcendence dungeons to drop Arcana cards for your character board.
- Open World Accessories: Field bosses and zone expedition events drop high-tier Heroic Rings, Necklaces, and Earrings scaling Critical/Accuracy.
- Mana Stone Socketing Priority:
Magic Accuracy (마법 명중)until hitting early dungeon caps →Magic Boost / Attack Power (마법 증폭)in remaining slots.
Part 2: Input, Macro & Performance Setup
1. Essential In-Game Settings
- Target AT LEAST 144 FPS (`Ctrl + R` in-game) for fluid animation cancels (평캔).
- Graphics Settings: Set Floater Info (정보 출력) to OFF except "Damage to Target". Set NVIDIA Reflex to On + Boost.
Option A — Skill Queue OFF (스킬 예약 OFF) [Highest DPS Ceiling]:
Disables input buffering for frame-perfect animation cancels on Combustion and Elemental Fusion. Requires stable low ping (<20ms) and rock-solid 144+ FPS to prevent dropped skills (스킬 씹힘).
Option B — Skill Queue ON (스킬 예약 ON) [Maximum Consistency]:
Buffers inputs to prevent skill drops during ping jitter or heavy boss mechanics. Slightly caps maximum animation cancel speed, but ensures total reliability.
3. In-Game Keybinds & Logitech G-Hub Macro Setup
Step 1: Required In-Game Keybinds
Configure the following primary and secondary key bindings in your game settings before setting up the mouse software:
- Quickslot 1:
Numpad 1 - In-Game Macro Key:
Numpad 2 - Quickslot 5:
Numpad 3
Step 2: In-Game Skillbar & In-Game Macro Configuration
Organize your skillbar layout and built-in macro chains as shown below:
Skillbar Layout:

- Quickslot 1 (Numpad 1): Primary attack/spammer skill (Frost Shock / auto-fillers).
- In-Game Macro Slot (Numpad 2): Linked directly to your in-game macro chain.
- Quickslot 5 (Numpad 3): Elemental Fusion (or core follow-up burst finisher).
In-Game Macro Sequence:
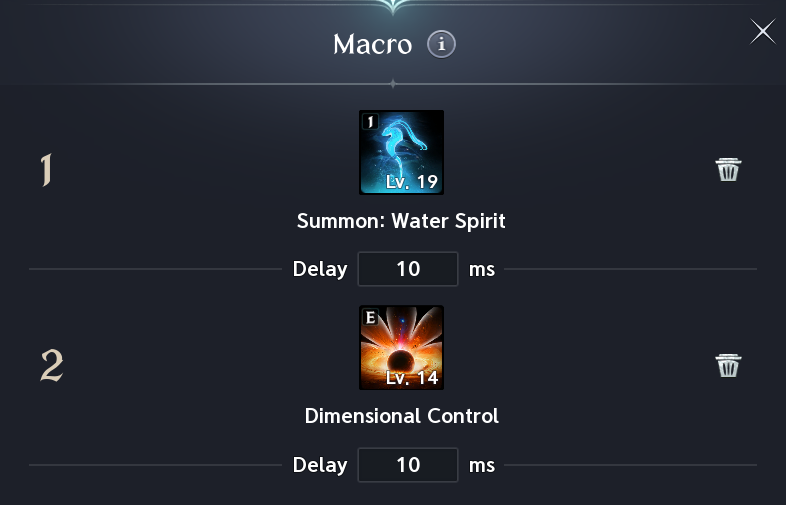
Inside the in-game Macro creation menu, chain the following abilities with a 10 ms internal delay:
- Slot 1:
Summon: Water Spirit— Delay: 10 ms - Slot 2:
Dimensional Control— Delay: 10 ms
Mana (MP) Management & Elemental Stacking Mechanics
- Managing MP Exhaustion: High-speed G-Hub macro canceling burns through MP rapidly. If you run low on MP during long encounters, swap to Water Spirit (물의 정령) or weave Siphon (흡인) into your manual filler cycles. Keep top-tier MP potions mapped to a quickbar shortcut.
- 4-Elemental Stack Rule (4원소): Elemental Fusion (원소 융합) requires 4 active Elemental Stacks to unlock maximum damage output. Your macro sequence is specifically spaced so that auto-fillers and joint-strikes generate these 4 stacks continuously without wasting cooldowns.
Step 3: Logitech G-Hub Mouse Macro Setup
Configure your mouse macro in G-Hub to execute the full rotation seamlessly when held down.
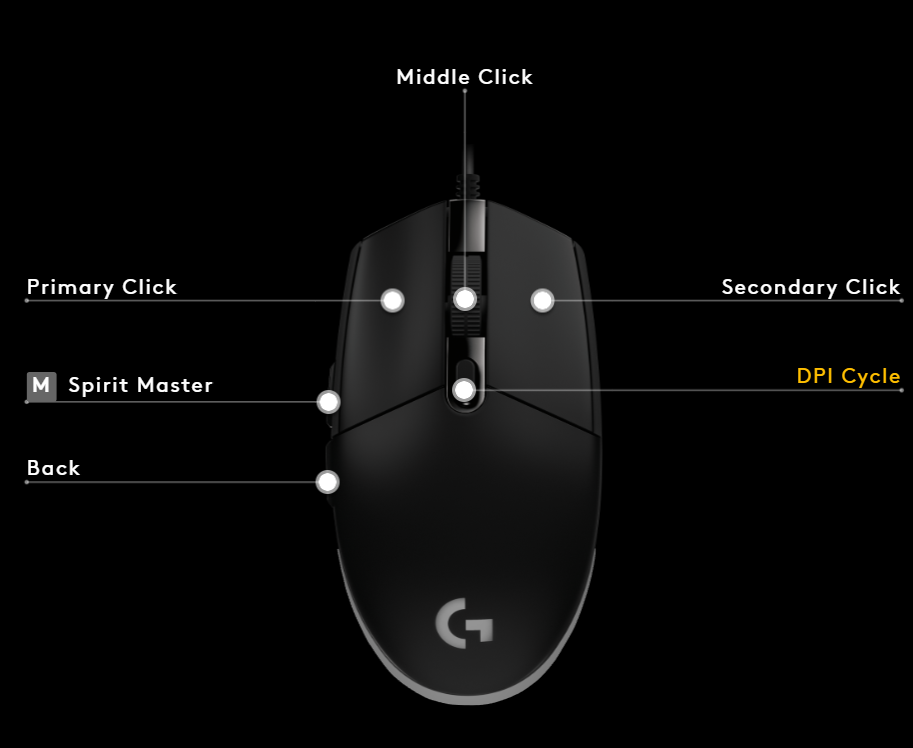
Assigned Mouse Button:
G-Hub Delays & Sequence:
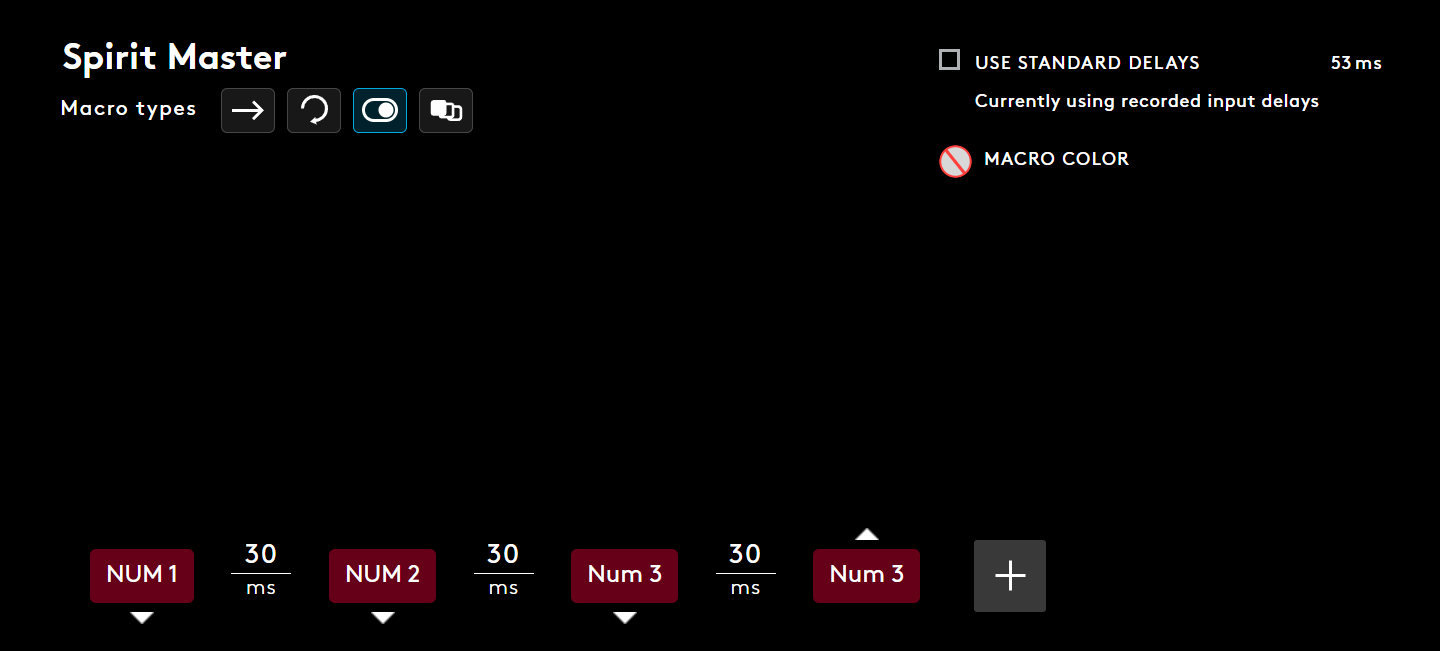
- Macro Type:
ToggleorRepeat While Holding. - Assigned Button:
Forward Side Button(labeled Spirit Master in G-Hub). - Execution Chain & Delays:
NUM 1→ 30 ms →NUM 2→ 30 ms →NUM 3→ 30 ms →NUM 3 - Delay Optimization Note: Keep G-Hub hardware delays set between 25 ms – 35 ms (30 ms recommended). Setting delays under 10 ms risks dropping target locks or failing skill queues after recent game patch updates.
Part 3: Familiar (Pet) Progression & Account Pacing
- Horizontal Roster Pacing: Level ALL unlocked Familiars evenly to Level 3 FIRST before taking any pet to Level 5.
- Genus Insight (종족 통찰): Account-wide Combat Power (CP) scales off total species collection thresholds. Spreading investment across 4–5 Level 3 pets grants vastly higher account stats per resource than rushing a single Level 5 pet.
- Soul Farming Strategy: Farm 10–15 souls in Zone A to reach Level 3, then rotate to Zone B. Avoid long open-world camping sessions that take away from daily dungeons and gear progression.
Part 4: Daevanion Points & Board Progression
Daevanion Boards grant essential baseline stat amplifications and skill modifier levels. Allocate your points outward from the central hub node, prioritizing active/passive skill enhancements and outer specialty nodes.
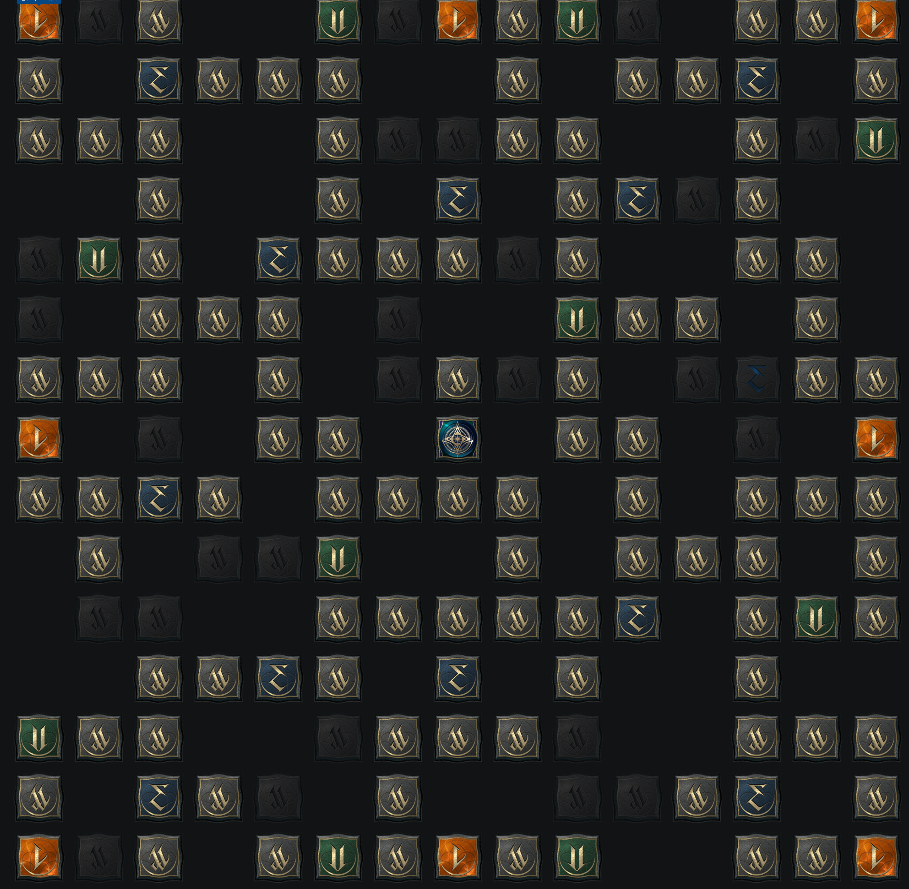
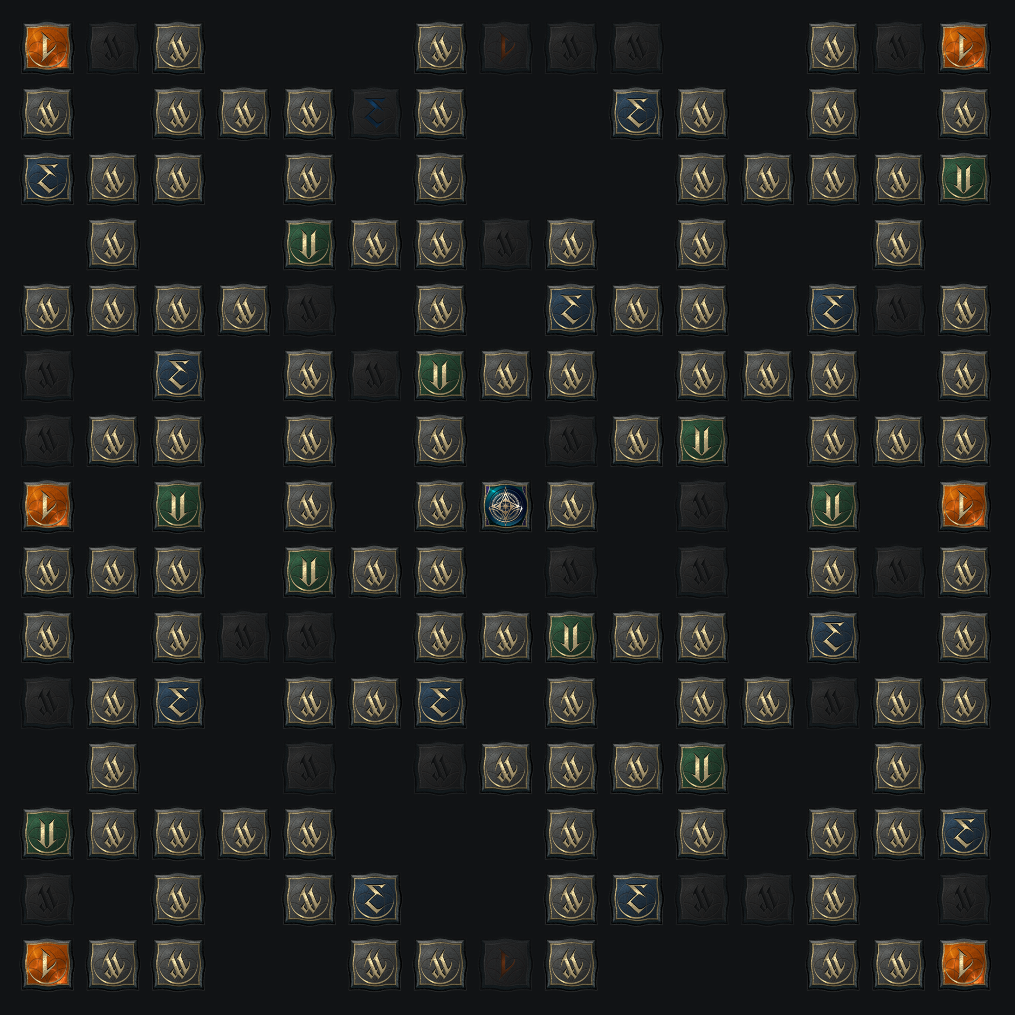
1. Nezekan Board Unlocks Lv 12
Focus: Primary Attack & Defense Foundation.
- Pathing Priority: Push straight from the core outward toward the active skill nodes boosting Combustion (화염 전소) and Frost Shock (냉기 충격).
- Outer Specialty Nodes: Target the upper and lower orange nodes to gain early-game Attack Power and Flat Defense.
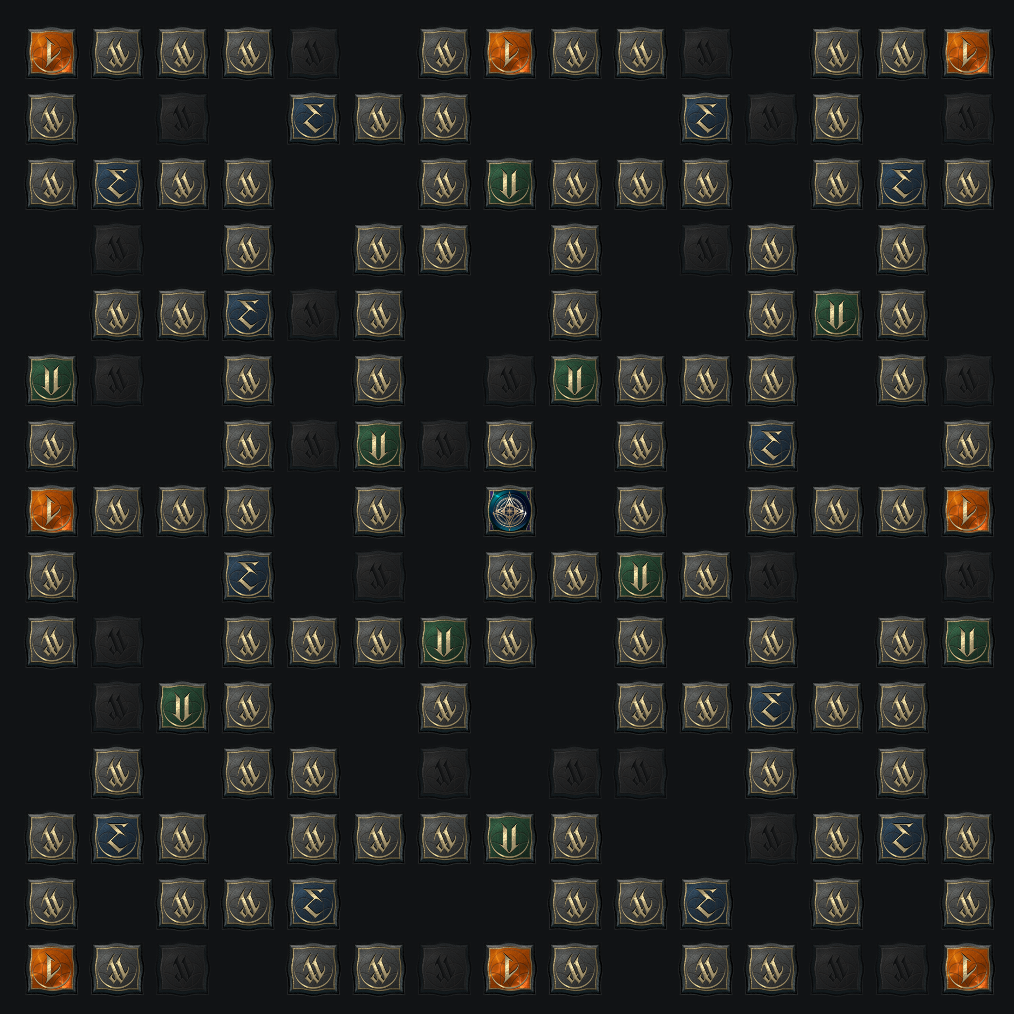
2. Zikel Board Unlocks Lv 20
Focus: General Damage Boost & Cooldown Reduction.
- Pathing Priority: Navigate through the middle paths to pick up Spirit Strike (정령 타격) passive nodes and core Attack % stats.
- Outer Specialty Nodes: Grab the top-left and bottom-right corner orange nodes to maximize total Damage Amplification.
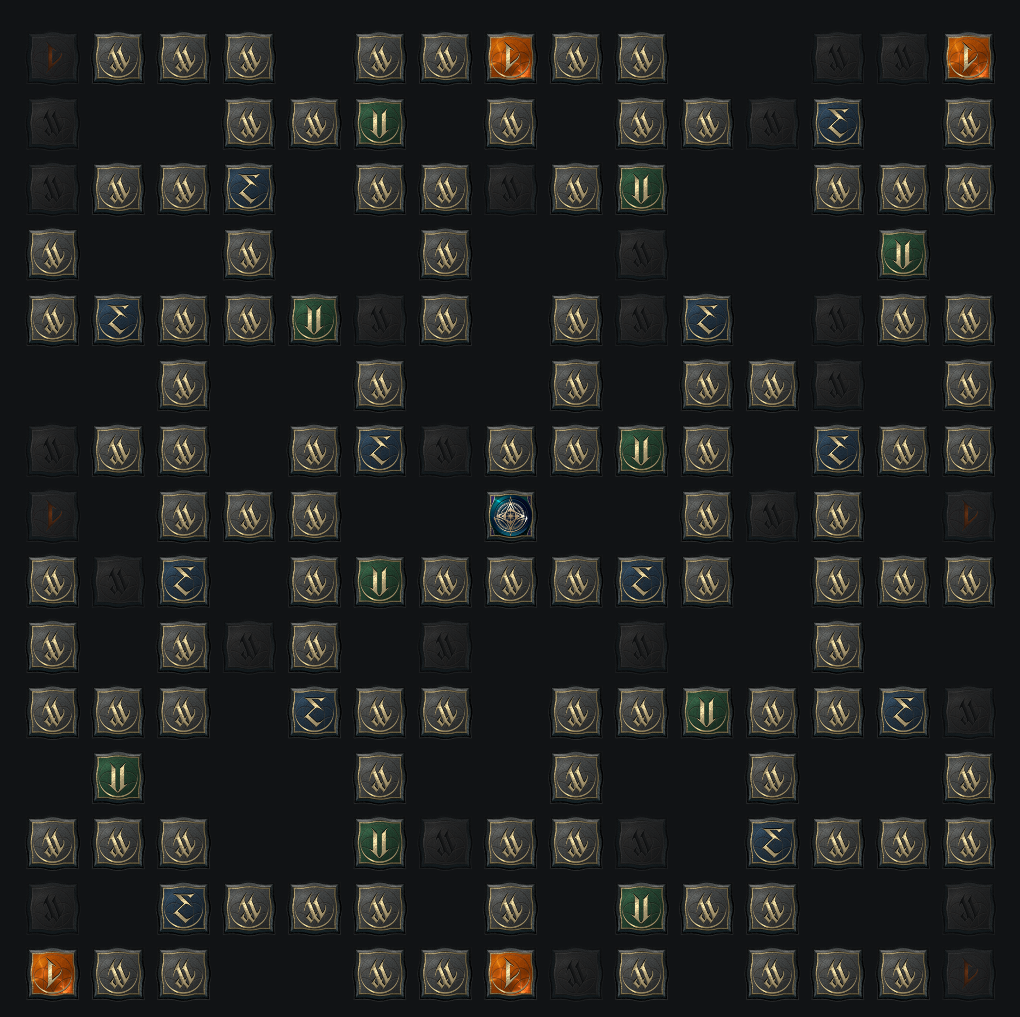
3. Vaizel Board Unlocks Lv 30
Focus: Critical Damage Boost & Perfection Stats.
- Pathing Priority: Focus on paths scaling Elemental Fusion (원소 융합) and Mental Focus (정신 집중).
- Outer Specialty Nodes: Direct your points toward the four cardinal orange nodes (top, bottom, left, right) to stack Critical Damage Amplification.
4. Triniel Board Unlocks Lv 40
Focus: Multi-Hit Chance & Attack Speed Scaling.
- Pathing Priority: Take the green passive skill branches to level up high-tier pet co-op abilities.
- Outer Specialty Nodes: Unlock the outer orange corner nodes for Multi-Hit Chance to maximize pet trigger proc rates.
Part 5: End-Game Titles & Wings (3-Slot Equipped Meta)
1. Offensive Title Slot (공격형 칭호)
Top Choice (PvE): Unbound by Genus (모든 종족의 이해자)
- Unlock: Reach Level 10 Genus Insight (종족 통찰/이해도) across all species.
- Equipped Stats: +5.5% PvE Damage Boost, +30 Attack Bonus, +80 Critical Hit.
- Ownership Bonus: +1% PvE Damage Boost.
- Meta Note: The undisputed BIS offensive slot title for Spiritmasters in PvE. Stacking total PvE Damage Boost maximizes your entire skill loop (Combustion, Elemental Fusion, pet co-op attacks).
Top Choice (PvP): Saint of Ereshkigal (에레슈키갈의 성자)
- Unlock: Reach Level 30 at the Abyss Monolith / Season PVP Achievements.
- Equipped Stats: +5.5% PvP Damage Boost, +4% Smite, +80 Critical Hit.
- Ownership Bonus: +4 PvP Attack.
- Meta Note: The premier offensive slot title for Abyss PvP and Open-World skirmishes.
2. Defensive Title Slot (방어형 칭호)
Top Choice (PvE BIS): Dominator of Dimensions (차원의 지배자)
- Unlock: Collect 25 wings / Dimensional Dungeon achievements.
- Equipped Stats: +5.5% PvE Damage Tolerance, +300 Defense Bonus, +90 Evasion Bonus.
- Ownership Bonus: +20 MP.
- Meta Note: The absolute #1 BIS Defensive title for Spiritmaster in dungeons. A flat +5.5% PvE Damage Reduction keeps you alive through massive boss AoE mechanics that would otherwise one-shot squishy classes.
Alternative (Boss Specific): Rule All Creation (만물의 통제자)
- Unlock: End-Game Boss Conquest achievements.
- Equipped Stats: +6% Boss Damage Tolerance, +5.5% Back Attack Damage Tolerance, +300 Defense Bonus.
- Ownership Bonus: +1% Move Speed.
- Meta Note: Excellent alternative for raid bosses with high targeted single-hit burst mechanics.
3. Utility / Other Title Slot (기타형 칭호)
Top Choice: Through Hell and Back (나생문을 넘어선) — [#1 PvE BIS Utility]
- Unlock: Clear all Sealed Dungeon (봉인 던전) stages.
- Equipped Stats: +5% Cooldown Reduction, +800 HP, +200 Stamina.
- Ownership Bonus: +10 Block.
- Meta Note: The holy grail utility title. +5% CDR accelerates your skill loop (Combustion, Elemental Fusion) and reduces pet co-op skill recovery, while +800 HP provides massive extra effective health.
Story Alternative: Encountering Kaisinel's Core (카이시넬의 근원을 마주하다)
- Unlock: Main Story Quest Completion.
- Equipped Stats: +5% Move Speed, +800 HP, +550 HP Potion Recovery.
- Ownership Bonus: +50 HP.
- Meta Note: Fantastic early-game utility title for positioning, kiting, and dodging boss telegraphs before unlocking Through Hell and Back.
4. Top 3 Recommended Wings for Spiritmaster
Wing choices dictate Boss Damage Amplification, Flat Defense, and Cooldown Reduction. Collecting and enhancing wings grants permanent account-wide collection stats.
Choice 1: Wings of the Forest Spirit (숲 정령의 날개) — [#1 PvE BIS]
- Acquisition Source: Conquest: Air Island of Vakron (바크론의 공중섬)
- Main Stats (기본 스탯): +95 Boss Attack Power (보스 공격력 95), +400 Flat Defense (추가 방어력 400)
- Special Effects (특수 효과): +3.5% Boss Damage Amplification (보스 피해 증폭 3.5%), +2.5% Damage Immunity (피해 면역 2.5%)
- Collection / Passive Bonus (수집/보유 효과): +0.2% Boss Damage Amplification (보스 피해 증폭 0.2%)
- Meta Note: Premier dungeon wings. Boosts overall burst output during boss stagger windows while granting baseline survivability.
Choice 2: Talisra Wings (공허의 탈리스라 날개) — [CDR & Skill Rhythm Meta]
- Acquisition Source: Season Shop (210,000 Oath Coins)
- Main Stats (기본 스탯): +60 Flat Attack Power (추가 공격력 60), +400 Flat Defense (추가 방어력 400), +35 Accuracy (추가 명중 35)
- Special Effects (특수 효과): +4% Cooldown Reduction (재사용 대기 시간 감소 4%), +2% Move Speed (이동 속도 2%)
- Collection / Passive Bonus (수집/보유 효과): +3 Flat Attack Power (추가 공격력 3)
- Meta Note: The 4% CDR accelerates your skill loop (Elemental Fusion → Jointstrike: Curse → Combustion) and reduces pet co-op skill recovery windows.
Choice 3: Wings of Nightmare (악몽의 날개) — [Crit-Stacking / Alternative PvE]
- Acquisition Source: Nightmare Shop (160,000 Dream Shards)
- Main Stats (기본 스탯): +60 Flat Attack Power (추가 공격력 60), +35 Critical Strike (치명타 35)
- Special Effects (특수 효과): +3.5% Boss Damage Amplification (보스 피해 증폭 3.5%), +1.5% Perfection (완벽 1.5%)
- Collection / Passive Bonus (수집/보유 효과): +5 Critical Strike (치명타 5)
- Meta Note: Solid alternative to Vakron wings if you need extra Critical Strike and Perfection to hit target stat thresholds while retaining Boss Damage Amp.